继光栅化之后的一大问题是,如何判断每个面谁被渲染,谁被遮挡。前一节的工作中我们绘制了所有的三角形面,但是并没有判断遮挡关系,也没有插值处理像素,这次我们解决这两个问题。
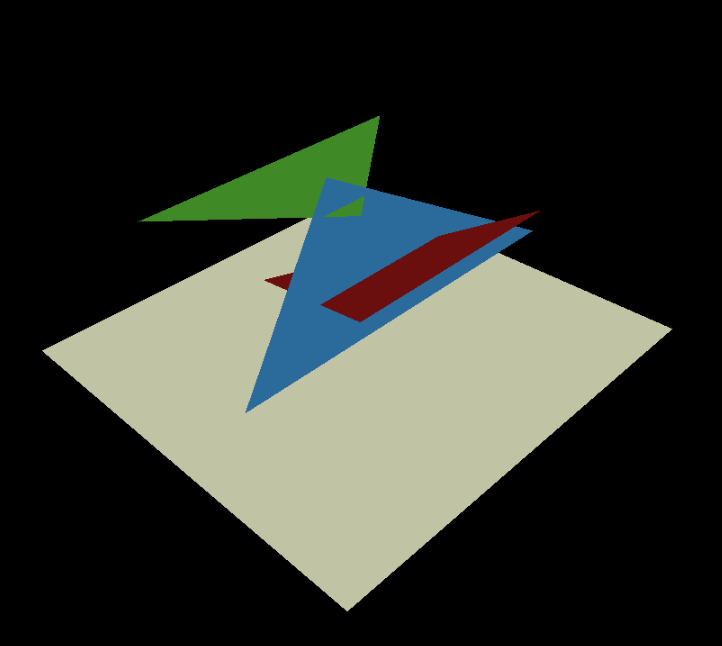
Lesson 3 Z-buffer 我们的渲染器初具规模,现在终于可以学习大名鼎鼎的Z-buffer了。首先我们先简述一下画家算法,它也是一种判断遮挡关系的简单算法,因为我们绘制是直接对像素进行赋值,所以可以想到从后往前绘制的话就能得到相对正确的渲染结果了。但是为什么说是相对正确呢?看下面这个图片:
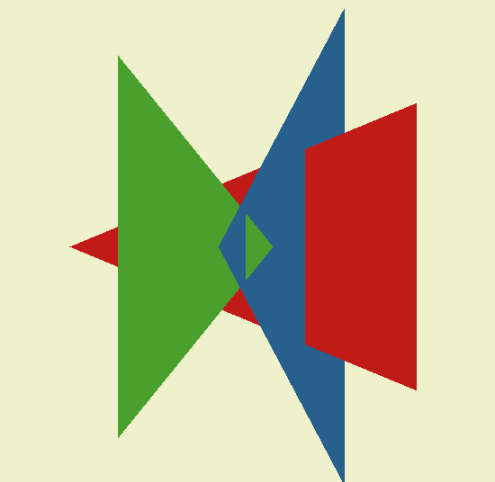
如果我们从上往下看这个场景,渲染结果应该是这样的:
发现问题了吗?如果使用画家算法,无法处理两个平面交叉时的情况,因为它们的遮挡关系不是不变的,上图中如果使用画家算法,先绘制红色三角形,然后绘制蓝色三角形,最后绘制绿色三角形,显然绿色三角形将会覆盖蓝色三角形,而不会呈现上图中交叉的正确结果。
因此我们需要采用一个buffer来存储具体像素而不是面的深度信息,以屏幕为原点Z轴正方向向里,在绘制像素时,只有当缓冲区中的深度信息大于像素的深度信息,才允许更新当前像素的颜色和深度值。buffer大小为总的像素数,初始化值为最小值。
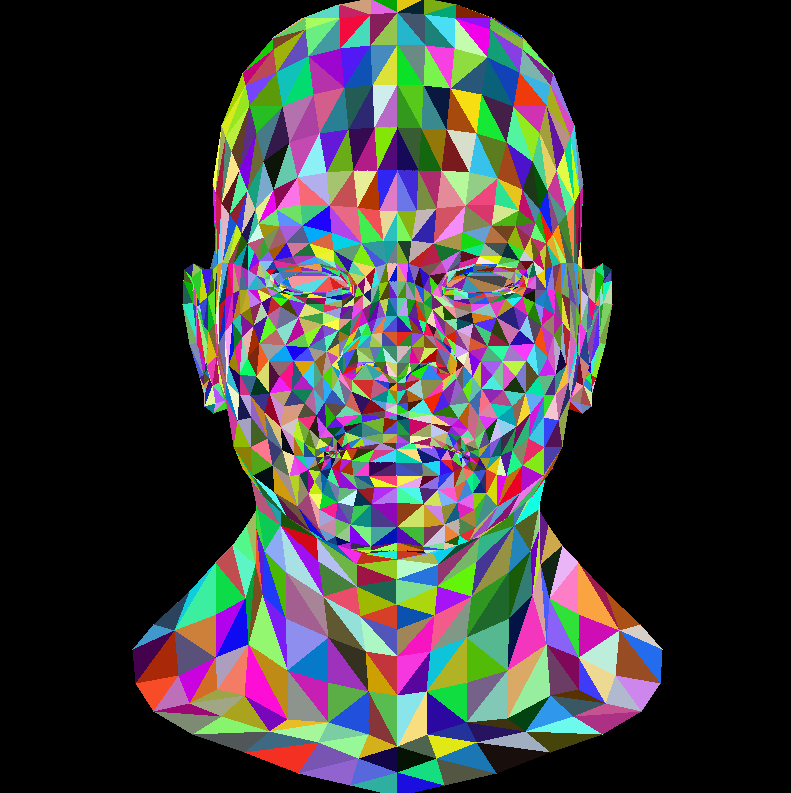
1 2 3 4 5 6 7 8 9 10 11 12 13 14 15 16 17 18 19 20 21 22 23 24 25 26 27 28 29 30 31 32 33 34 35 36 37 38 39 40 41 42 43 44 45 #include "Lesson3.h" const TGAColor white = TGAColor (255 , 255 , 255 , 255 );const TGAColor red = TGAColor (255 , 0 , 0 , 255 );const TGAColor green = TGAColor (0 , 255 , 0 , 255 );Model* model = NULL ; const int width = 800 ;const int height = 800 ;Vec3f light_dir (0 , 0 , -1 ) ;Vec3f world2screen (Vec3f v) { return Vec3f (int ((v.x + 1. ) * width / 2. + .5 ), int ((v.y + 1. ) * height / 2. + .5 ), v.z); } int main (int argc, char ** argv) if (2 == argc) { model = new Model (argv[1 ]); } else { model = new Model ("obj/african_head.obj" ); } float * zbuffer = new float [width * height]; for (int i = width * height; i--; zbuffer[i] = -std::numeric_limits<float >::max ()); TGAImage image (width, height, TGAImage::RGB) ; for (int i = 0 ; i < model->nfaces (); i++) { std::vector<int > face = model->face (i); Vec3f pts[3 ]; for (int j = 0 ; j < 3 ; j++) { pts[j] = world2screen (model->vert (face[j])); } Triangle_ZBuffer::Triangle (pts, zbuffer, image, TGAColor (rand () % 255 , rand () % 255 , rand () % 255 , 255 ), width); } image.flip_vertically (); image.write_tga_file ("output.tga" ); delete model; return 0 ; }
当然我们修改了一下之前绘制三角形的方法:
1
2
3
4
5
6
7
8
9
10
11
12
13
14
15
16
17
18
19
20
21
22
23
24
25
26
27
28
29
30
31
32
33
34
35
36
void Triangle_ZBuffer::Triangle (Vec3f* pts, float * zbuffer, TGAImage& image, TGAColor color, int width) Vec2f bboxmin (std::numeric_limits<float >::max(), std::numeric_limits<float >::max()) ; Vec2f bboxmax (-std::numeric_limits<float >::max(), -std::numeric_limits<float >::max()) ; Vec2f clamp (image.get_width() - 1 , image.get_height() - 1 ) ; for (int i = 0 ; i < 3 ; i++) { for (int j = 0 ; j < 2 ; j++) { bboxmin[j] = std::max (0.f , std::min (bboxmin[j], pts[i][j])); bboxmax[j] = std::min (clamp[j], std::max (bboxmax[j], pts[i][j])); } } Vec3f p; for (p.x = bboxmin.x; p.x <= bboxmax.x; p.x++) { for (p.y = bboxmin.y; p.y <= bboxmax.y; p.y++) { Vec3f bc_screen = barycentric (pts, p); if (bc_screen.x < 0 || bc_screen.y < 0 || bc_screen.z < 0 ) continue ; p.z = 0 ; for (int i = 0 ; i < 3 ; i++) p.z += pts[i][2 ] * bc_screen[i]; if (zbuffer[int (p.x + p.y * width)] < p.z) { zbuffer[int (p.x + p.y * width)] = p.z; image.set (p.x, p.y, color); } } } }
使用了深度缓冲之后,我们就可以避免之前的错误渲染顺序了,下面是得到的结果:
如果你想使用上次课程中简单的光照模拟自然也不是问题,计算的方法和上次完全一致:
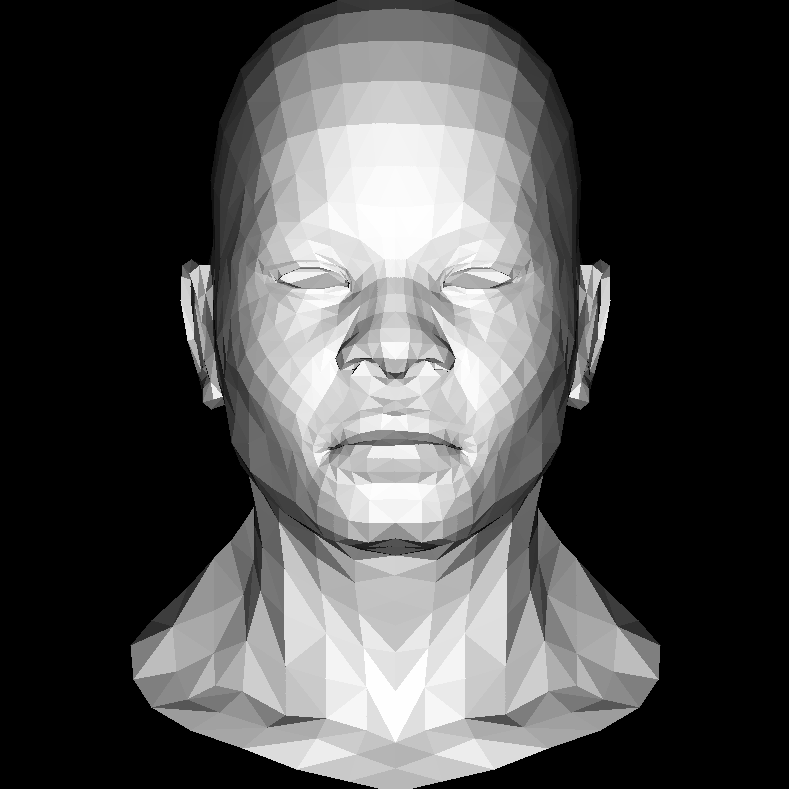
1
2
3
4
5
6
7
8
9
10
11
12
13
14
15
16
for (int i = 0 ; i < model->nfaces (); i++) { std::vector<int > face = model->face (i); Vec3f pts[3 ]; Vec3f world_coords[3 ]; for (int j = 0 ; j < 3 ; j++) { pts[j] = world2screen (model->vert (face[j])); world_coords[j] = model->vert (face[j]); } Vec3f normal = cross (Vec3f (world_coords[2 ] - world_coords[0 ]), Vec3f (world_coords[1 ] - world_coords[0 ])).normalize (); float intensity = normal * light_dir; if (intensity > 0 ) Triangle_ZBuffer::Triangle (pts, zbuffer, image, TGAColor (intensity * 255 , intensity * 255 , intensity * 255 , 255 ), width); }
完成的效果是下面这样的,对比上次的结果,我们这次把不同的面都正确绘制出来了,尤其是嘴巴。
插值计算和纹理 阅读代码后你肯定注意到,前面的部分我们为了获得每个像素单独的深度值,实际上是先计算p的重心坐标,根据这个面上三个顶点的深度值进行插值得到了p点的深度值。这是就不得不说到另一部分重要的知识:纹理。
这里不再具体讲原理了,之前说obj文件格式的时候提到里面存储了一个vt开头的行,就是代表纹理坐标,顶点将读取坐标找到纹理图中的颜色,作为该顶点的颜色。那么有了三个顶点的颜色之后,我们自然可以通过对三个顶点的颜色插值得到像素点的颜色了。注意我们不是对纹理坐标进行插值,我不能确定它是否正确,因为某些模型的纹理坐标并不保证是连续的,对颜色插值是最保险的方法。
这部分是作者给出的作业,并没有实例代码,所以简单说下思路:读取表示obj模型一个面的数据,它的形式大概是:f x/x/x x/x/x x/x/x,第一个x是顶点序号,第二个x是顶点对应的纹理坐标序号,首先要想办法把这个值读出来;之后在main中调用前面写的方法得到纹理坐标,它范围是[0,1],读取颜色的话需要先用tga读纹理图,出来是一个二维数组,那么纹理坐标的xy分别乘以宽高,得到的就是一个TGAColor值,存储三个顶点的颜色,然后插值,再乘以光照强度,最后就是颜色了。
我们一步一步来实现。
读取纹理坐标 Model类中原来只写了读取顶点和边的构造函数,我们修改其中的内容,添加私有变量texcoord_,然后同样构造函数中赋值。注意两个地方,第一由于行开头是vt,trash要收集两次;第二obj文件中纹理坐标还是三维的,只不过第三维是0,所以要声明为Vec3f。
1 2 3 4 5 6 7 8 9 10 11 12 13 14 15 16 17 18 19 20 21 22 23 24 25 26 27 28 29 30 31 32 33 34 35 36 37 38 39 Model::Model (const char *filename) : verts_ (), faces_ () { std::ifstream in; in.open (filename, std::ifstream::in); if (in.fail ()) return ; std::string line; while (!in.eof ()) { std::getline (in, line); std::istringstream iss (line.c_str()) ; char trash; if (!line.compare (0 , 2 , "v " )) { iss >> trash; Vec3f v; for (int i=0 ;i<3 ;i++) iss >> v[i]; verts_.push_back (v); } else if (!line.compare (0 , 2 , "f " )) { std::vector<int > f; std::vector<int > ft; int itrash, idx, texidx; iss >> trash; while (iss >> idx >> trash >> texidx >> trash >> itrash) { idx--; f.push_back (idx); ft.push_back (texidx); } faces_.push_back (f); faces_tex_.push_back (ft); } else if (!line.compare (0 , 3 , "vt " )) { iss >> trash; iss >> trash; Vec3f vt; for (int i = 0 ; i < 3 ; i++) iss >> vt[i]; texcoords_.push_back (vt); } } std::cerr << "# v# " << verts_.size () << " f# " << faces_.size () << std::endl; }
我增加了两个成员函数:
1 2 3 4 std::vector<std::vector<int > > faces_tex_; std::vector<Vec3f> texcoords_;
然后给出返回纹理坐标的方法,注意在返回对应纹理坐标序号的纹理坐标时,texidx要减少1,因为obj中序号从1开始,而我们的数组从0开始。
1 2 3 4 5 6 7 8 9 10 11 std::vector<int > Model::faceTex (int idx) return faces_tex_[idx]; } Vec2f Model::texcoord (int texidx) return Vec2f (texcoords_[texidx - 1 ][0 ], texcoords_[texidx - 1 ][1 ]); }
返回纹理颜色 阅读TGA读写的方法,其中给出一个get方法用来返回像素(i,j)的颜色,所以我们这里编写一个Texture类,提供返回像素颜色的方法。注意读取图片后我对图片数据进行了垂直反转,因为数据存储颜色从图片的左上角开始,纹理坐标原点是左下角,因此需要将它上下反转。
1 2 3 4 5 6 7 8 9 10 11 12 13 14 Texture::Texture (const char * filename) { texture.read_tga_file (filename); texture.flip_vertically (); width = texture.get_width (); height = texture.get_height (); } TGAColor Texture:: texColor (Vec2f texcoord) { return texture.get (int (texcoord.x * (width)), int (texcoord.y * (height))); }
插值计算像素颜色 现在通过调用纹理类,我们可以得到每个面的三个顶点的纹理颜色,对颜色进行插值,最后就能计算当前像素的颜色值了。而插值是在绘制三角形的时候,遍历每个包围盒中的像素,才能得到像素对应的重心坐标,因此现在像素颜色将由绘制三角形的方法决定,我们取消之前传入颜色的做法,将光照强度和该三角形三个顶点的颜色传入,再进行插值。
值得注意的是,常见的方法应该是通过对三个顶点的纹理坐标进行插值,根据插值得到的纹理坐标映射找到纹理颜色,作为像素的颜色。不过这种方法我们后续也会使用,所以这里我选择对颜色进行插值,这种方法得到的结果显然不如纹理映射得到的效果好,特点在于平滑了颜色值。
1 2 3 4 5 6 7 8 9 10 11 12 13 14 15 16 17 18 19 20 21 22 23 24 25 26 27 28 29 30 31 32 33 34 35 36 37 38 39 40 41 42 43 44 45 46 47 48 49 50 51 52 53 54 55 56 57 58 59 60 61 62 63 64 #include "Lesson3.h" #include "texture.h" const TGAColor white = TGAColor (255 , 255 , 255 , 255 );const TGAColor red = TGAColor (255 , 0 , 0 , 255 );const TGAColor green = TGAColor (0 , 255 , 0 , 255 );Model* model = NULL ; const int width = 800 ;const int height = 800 ;Vec3f light_dir (0 , 0 , -1 ) ;Vec3f world2screen (Vec3f v) { return Vec3f (int ((v.x + 1. ) * width / 2. + .5 ), int ((v.y + 1. ) * height / 2. + .5 ), v.z); } int main (int argc, char ** argv) if (2 == argc) { model = new Model (argv[1 ]); } else { model = new Model ("obj/african_head.obj" ); } float * zbuffer = new float [width * height]; for (int i = width * height; i--; zbuffer[i] = -std::numeric_limits<float >::max ()); TGAImage image (width, height, TGAImage::RGB) ; Texture tex ("obj/african_head/african_head_diffuse.tga" ) ; for (int i = 0 ; i < model->nfaces (); i++) { std::vector<int > face = model->face (i); std::vector<int > faceTex = model->faceTex (i); Vec3f pts[3 ]; Vec2f ptstex[3 ]; Vec3f world_coords[3 ]; TGAColor vertColors[3 ]; for (int j = 0 ; j < 3 ; j++) { pts[j] = world2screen (model->vert (face[j])); ptstex[j] = model->texcoord (faceTex[j]); world_coords[j] = model->vert (face[j]); vertColors[j] = tex.texColor (ptstex[j]); } Vec3f normal = cross (Vec3f (world_coords[2 ] - world_coords[0 ]), Vec3f (world_coords[1 ] - world_coords[0 ])).normalize (); float intensity = normal * light_dir; if (intensity > 0 ) Triangle_ZBuffer::Triangle (pts, zbuffer, image, intensity, width, vertColors); } image.flip_vertically (); image.write_tga_file ("output.tga" ); delete model; return 0 ; }
然后记得修改绘制三角形的方法:
1
2
3
4
5
6
7
8
9
10
11
12
13
14
15
16
17
18
19
20
21
22
23
24
25
26
27
28
29
30
31
32
33
34
35
36
37
38
39
40
41
42
43
44
void Triangle_ZBuffer::Triangle (Vec3f* pts, float * zbuffer, TGAImage& image, float intensity, int width, TGAColor* vertColors) Vec2f bboxmin (std::numeric_limits<float >::max(), std::numeric_limits<float >::max()) ; Vec2f bboxmax (-std::numeric_limits<float >::max(), -std::numeric_limits<float >::max()) ; Vec2f clamp (image.get_width() - 1 , image.get_height() - 1 ) ; for (int i = 0 ; i < 3 ; i++) { for (int j = 0 ; j < 2 ; j++) { bboxmin[j] = std::max (0.f , std::min (bboxmin[j], pts[i][j])); bboxmax[j] = std::min (clamp[j], std::max (bboxmax[j], pts[i][j])); } } Vec3f p; for (p.x = bboxmin.x; p.x <= bboxmax.x; p.x++) { for (p.y = bboxmin.y; p.y <= bboxmax.y; p.y++) { Vec3f bc_screen = barycentric (pts, p); if (bc_screen.x < 0 || bc_screen.y < 0 || bc_screen.z < 0 ) continue ; p.z = 0 ; TGAColor curColor (0 , 0 , 0 , 255 ) ; int count = 0 ; for (int i = 0 ; i < 3 ; i++) { p.z += pts[i][2 ] * bc_screen[i]; curColor = curColor + vertColors[i] * bc_screen[i]; } if (zbuffer[int (p.x + p.y * width)] < p.z) { zbuffer[int (p.x + p.y * width)] = p.z; image.set (p.x, p.y, curColor * intensity); } } } }
注意,上面我们对TGAColor类型的值使用了+号,文件中没有给出该符号的重载,因此我们也必须手动补充在TGAColor的结构体中:
1
2
3
4
5
6
7
8
9
TGAColor operator +(const TGAColor tgacolor) const { TGAColor res (0 ,0 ,0 ,255 ) ; for (int i = 0 ; i < 3 ; i++) { res.bgra[i] = this ->bgra[i] + tgacolor.bgra[i]; } return res; }
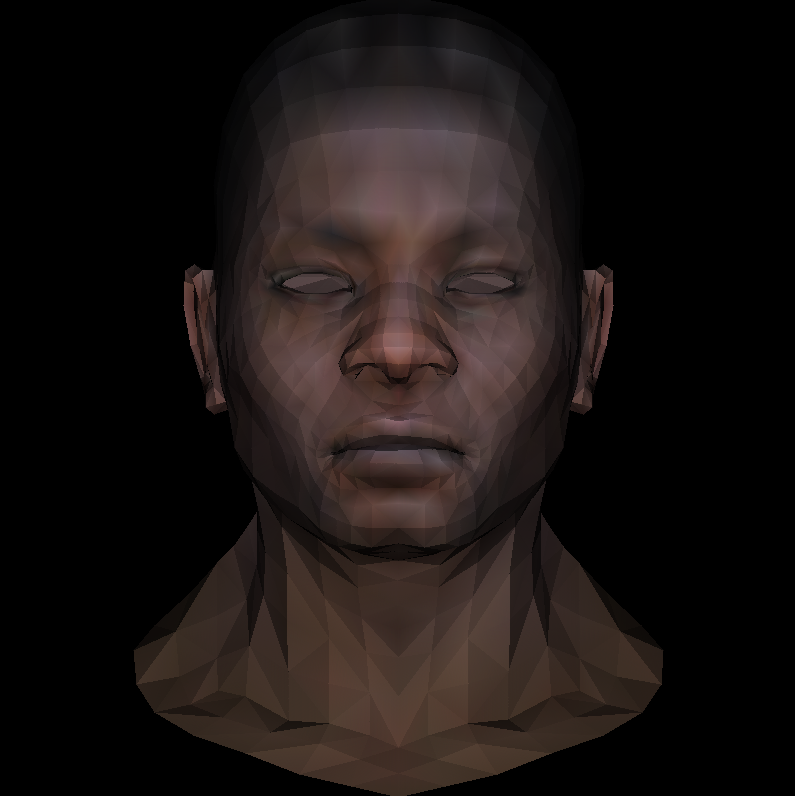
最后渲染得到的效果就是这样的:
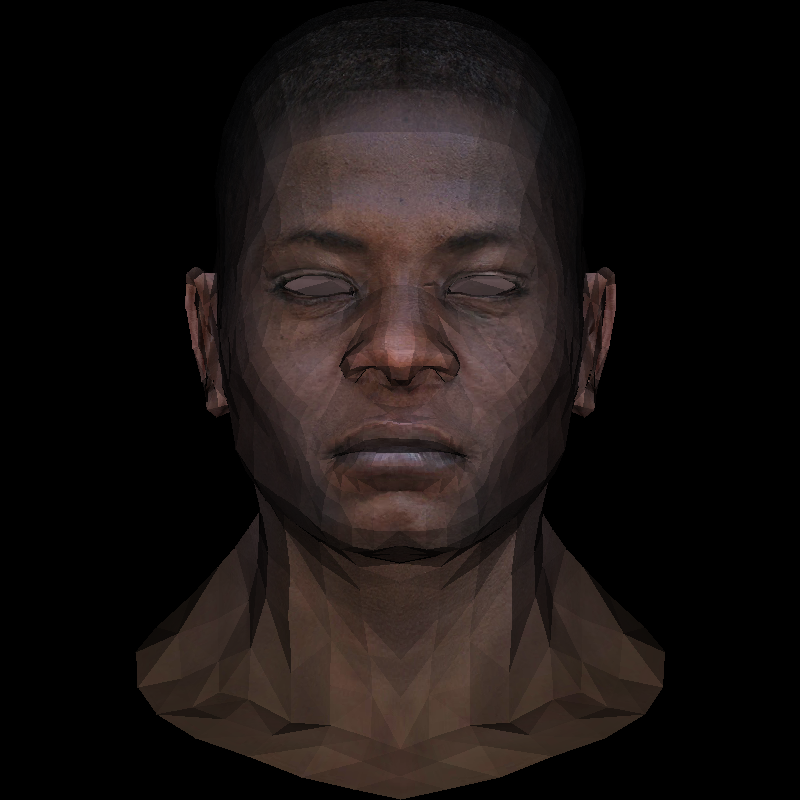
模型还是棱角分明,但如果你看到人物额头部分,就能明白我们已经对三角形进行了平滑,但是由于采样频率太低,也就是每次仅仅对三个顶点的颜色插值,得到的纹理细节不足,单个三角形上能看到平滑的表现,但是不同三角形之间就很难关联了,所以造成这样的结果。对比一下采用坐标插值的结果:
这就是为什么我们要对纹理坐标进行插值,而不是颜色插值。当然对颜色插值或许也有它自己的用途。下节内容我们将回顾MVP变换。